Thursday, September 18, 2008

Limited Supply Challenge

Today's Limited Supply Challenge over at SCS was right up my ally! I tend to lean towards simple layouts and today's challenge required us to use white as the main color, our choice of brown, black, or gray, and one additional color of our choice. We could also use embossing folders but no background stamps. The main image had to be the same colors as our cardstock (no additional colors) and we were allowed one sentiment. We were also allowed to use ribbon or other embellishements. Here's what I came up with...


RECIPE:
Stamps: Merry & Warm Words (Retired SU)
Ink: Pure Poppy (PTI) & Basic Gray
Paper: White, Pure Poppy, & Basic Gray
Accessories: Christmas Ornaments Cuttlebug embossing folder, Classic and Scalloped Circle Nestabilities, Pure Poppy double stitched ribbon, dimentionals, stickles


It's a simple card, but I think the ribbon and dry embossed background add a lot! The colors remind me of Ohio State University, but then again I live in Ohio so everything scarlett and gray is attributed to OSU.


Thanks so much for looking today! Have a fantastic day!!! :)

Spooky Tree

I'm late getting around to stamping today. I went and got a massage after work and then came home and cooked dinner around 7:00. I had hoped to get to this sooner, but better late than never!

Today's "Ways to Use It" challenge on SCS was to use a silhouette stamp. Silhouettes are SOOOOO popular right now! Stampin' Up! has some great sets with natural silhouettes and GinaK just released an awesome Halloween set. Have I mentioned that I LOVE making Halloween cards???? Have I mentioned that I LOVE collecting Halloween sets????

Here's my card...


RECIPE:
Stamps: Spooky Silhouettes (GinaK)
Ink: Stazon Black, Craft White, & Reinkers in Pumpkin Pie, Elegant Eggplant, Old Olive
Paper: Pumpking Pie, Elegant Eggplant, Old Olive, Glossy White
Accessories: 1/4 inch grosgrain ribbon in Elegant Eggplant, ticket corner punch, word window punch, Pumpkin Harvest Cuttlebug embossing folder, pumpkin brad from Making Memories
Techniques: Striped Wipe, sponging

I love how this turned out! The photograph isn't the best because I didn't have any daylight to work with, but I do love this card.

Thanks so much for stopping by today! I hope you have a wonderful day!!! :)

Wednesday, September 17, 2008

Beary Scary

I took the day off from blogging yesterday and went out to dinner with my husband after work. We bummed around the mall for a little bit and then hit Olive Garden. It was a nice, well deserved night out.

Today's sketch challenge on SCS was a fun one! I got the chance to use some of my SU Ghostly Greetings designer paper and of course I had to reach for that adorable Spooky bear from C.C. Designs. Super cute!!!

Anyways, here's my card...


RECIPE:
Stamps: "Spooky Spooky Spooky" by C.C. Designs
Ink: Black Momento
Paper: Basic Gray, Kiwi Kiss, Ghostly Greetings dp (SU)
Accessories: Copic Markers, bat brads (Making Memories), dimentionals, classic rectangle Nestabilities, Spica Silver glitter pen, ticket corner punch


Isn't he just adorable!!! I cut the rectangles with my classic rectangle Nestabilities and then cut some of the corners with my ticket corner punch. This made it easier to use the black bat brads.

I love how sparkley the bear's cape is! I colored it with a dark gray Copic marker and then went over it with silver Spica glitter pen.

Thanks so much for looking today!!! Have a wonderful day!!! :)

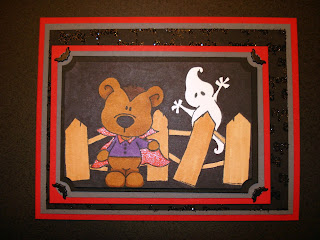
Monday, September 15, 2008

Windy Weather

Well, we survived the windy weather courtesy of Hurricane Ike. I'm sure our weather here in NE Ohio was nothing compared to what the people down and Texas went through, but we were pretty windblown here. A lot of schools were closed around NE Ohio today (not mine!) and there is talk on the news that some areas will be out of power until the end of the week. I was very lucky. Our electricity flickered a lot, but never went out. My parents live about 3 miles away and lost their power for about 45 minutes, but that was about it. We had a few tree branches down around out yard, and a few trees down in the surrounding neighborhood, but our house basically came through A-okay! Thanks for your concern!

Today's technique challenge was fun! It was to use a background stamp, a glue ink pad, and glitter to create a "now you see it, now you don't" background. I chose to use my new C.C. Designs stamp sets that were happily waiting for me when I got home from work today. I got so carried away coloring my main images, that I made that panel too big! The background is stamped with the word "spooky" over and over and glittered in black glitter, but the main image panel is so big that you can barely see it. I guess I should call mine a "Now you don't see it" background, since I covered most of it up!

I could have started over with my main image panel, but by then I already had all my pieces cut and glued together, and I was running out of time. I'm a very slow stamper, so to start over would have meant I'd be up later than I wanted to be. This just gives me another excuse to stamp, right???? Anyways, enough babble! Here's the card...

Isn't it cute???? Too bad you can't really see the background too well. Oh well.. another day!

RECIPE:
Stamps: "Spooky Spooky Spooky" and "Spooky Background" from C.C. Designs
Ink: Black Momento, Essential Glue Pad
Paper: Basic Black, Real Red, Basic Gray, white
Accessories: Black glitter, Copic Markers, corner rounder punch, ticket corner punch, bat brads from Making Memories, red Spica glitter pen

The bear's cape is colored with a red copic marker, and then I colored red spica glitter pen over top to make it really sparkly. The result is really cool in real life!

Thanks so much for looking today!!! Have a wonderful day!!! :)

Sunday, September 14, 2008

Featured Stamper... Fall Leaves

Today's Featured Stamper at SCS was LazyLizard. I chose THIS card from her gallery to case. I changed several things, but kept the layout the same. I used different designer paper and a different stamp set, but also kept the same fall leaves theme. Here's my card...


RECIPE:
Stamps: Autumn Leaves (GinaK)
Ink: Momento Black
Paper: Really Rust, Very Vanilla, Autumn Vine DP (SU)
Accessories: Copic Markers, Brads, classic square Nestabilities, Color spritzer tool


This isn't one of my favorite cards, but I think it turned out okay. I've been itching to use my new GinaK stamps so I knew just which set I wanted to play with today.

Thanks so much for looking today!!! Have a great day! :)

Saturday, September 13, 2008

Inspiration Challenge--Pier 1

Hey everyone! Today's inspiration challenge on SCS was to be inspired by THIS room. I chose to be inspired by the art leaning up against the wall on the left side of the room and so I designed today's card around that piece.

I actually made two cards and used different ribbon on each. I'm undecided as to which ribbon I prefer, and would love for my viewers to give their opinions! Please feel free to leave a comment and let me know which ribbon you prefer.

Here's the cards...


Soooo.... which one???


Both cards are basically the same except for the ribbon. I colored the flowers with my copic markers... using yellow on most of the flower image and then blending in pink into the middles. I then colored gray in the background and used a darker shade of gray to outline the flowers and make them pop. Here's the recipe...

RECIPE:
Stamps: Garden of Life (Papertrey Ink)
Ink: Black (Momento)
Paper: White & Dark Chocolate (Papertrey Ink), Basic Gray (SU)
Accessories: Copic Markers, Cuttlebug embossing border (left side of card... hard to see in the pictures), Dark Chocolate Ribbon--Polka dot satin or Regular Satin (Papertrey Ink)

Thanks so much for stopping by my blog today! Have a wonderful day! :)

Thursday, September 11, 2008

Spooky Sponged Halloween Card

My new Gina K sets finally arrived!!! Yay! I ordered 3 new sets, plus the "Free with 3" set. I am so in love with her newest Halloween set. It's truly spooktacular! Plus, I'm addicted to Halloween stamp sets. Some people collect Christmas stamp sets, I collect Halloween sets.

I started out this card with the intention of participating in the SCS Ways to Use It challenge which required participants to use white gel pen on their card. Well, once I got going, I just couldn't bear to put white gel pen on and risk ruining what I was really starting to like! So I scrapped today's challenge and went with my gut tonight. I tried to make the background brayered like Michelle Zindorf does, but mine turned out much different than hers do. I really like how mine turned out! The photograph unfortunately does not do this card justice... the colors are really muted here... not as spooky as the card looks in real life. I need to get a better photo editing program, but I'll just have to stick with what I have for right now. Maybe I'll ask for one at Christmas. If anyone has any suggestions on an easy-to-use photo editing program, please let me know!

RECIPE:
Stamps: Spooky Silhouettes (Gina K)
Ink: Black, Basic Gray, Summer Sun, More Mustard, Pumpkin Pie, Versamark
Paper: Ghostly Greetings DP (SU), Pumpkin Pie, Black, Basic Gray
Accessories: Spiderweb Cuttlebug embossing folder, small and large oval punches, clear embossing powder, brayer
Techniques: sponging and brayering

To create the background behind the scarecrow I brayered Summer Sun onto white cardstock. Then I brayered More Mustard ontop and a little above the Summer Sun. Finally I sponged Pumpkin Pie ink at the top of the cardstock. I stamped the sun in versamark and embossed it with clear embossing powder. To get the foggy look, I carefully sponged (very lightly!) basic gray over everything. This made the sun pop out more too. I finally sponged black ink along the bottom to create the ground. To emphasize the spiderwebbed layer, I also sponged basic gray ink on the raised embossed part of the cardstock.

Can you believe that there aren't any embellishments on this card? I tried black buttons, black bat brads, and ribbon but I thought that they just added "clutter" to the card. It was busy enough with all the sponging and layers of patterned paper and dry embossed cardstock. Sometimes less is more, I guess.

Anyways, thanks so much for looking! Have a wonderful day!!! :)

Wednesday, September 10, 2008

Fall Foliage

While I'm not quite ready yet for summer to end and fall to begin, one thing I always look forward to in the fall is the beautiful fall colors. The trees are always so inspiring in my crafting and I am always ready to use fall colors in my work. Today's sketch challenge came easily for me today. I took one look at the sketch and knew what I wanted to do.

I love how this turned out! I haven't used the thumping technique on a card in a while and it just seemed natural to pull out my markers and start thumping away on the autumn leaves for this card.

RECIPE:
Stamps: Season of Friendship, Canvas, Everyday Flexible Phrases (all SU)
Ink: Chocolate chip, More Mustard, Really Rust
Paper: More Mustard, Really Rust, Chocolate Chip, White, Autumn Vine Designer Paper
Accessories: Brads, Circle punches (3/4 inch, 1 inch, 1 1/4 inch, & 1 3/8 inch), dimentionals
Techniques: thumping

Thanks for all the comments about my little tutorial on using the new SU Sizzix dies in the Cuttlebug. I'm so happy that it was useful to people and has really surprised me with the amount of traffic that has visited my blog! It's so exciting! I'm trying my best to keep up with posting new things for my new subscribers... I feel so lucky! Thanks so much for checking out my work and all the compliments. I'm truly flattered.

Thank you so much for checking out my blog today. I hope you enjoy and are inspired by what you see! Have a wonderful day!!! :)

Tuesday, September 9, 2008

Ugggh! Frolicking Frogs

Today's color challenge was a doozie for me! Ridinghood Red, Green Galore, and Going Gray! Well, I didn't have any Going Gray so I used Basic Gray instead. I tried so hard not to make a Christmas card... those colors were tough though! Anyways, here's what I came up with...

RECIPE:
Stamps: Frolicking Frogs (SU retired)
Ink: Momento Black
Paper: Green Galore, Ridinghood Red, Basic Gray, white
Accessories: Copic markers, Threading Waters punch, Ridinghood Red striped grosgrain ribbon, distressed stripes Cuttlebug embossing folder

I colored the image with my Copic markers and sponged kind of heavily around the edges of the Basic Gray panel. I didn't mean to sponge that heavily, but I messed up and had to even it out. Oops! These colors were really hard for me to work with, but the outcome isn't too bad. Not one of my favorites and I don't think I'll be pulling this color combo out again anytime soon.

Thanks for looking! Have a wonderful day!!! :)

Monday, September 8, 2008

Haunted Shimmer

Here's today Technique challenge on SCS. I'm not sure I like this technique... it was definitely new to me. This is the Embossed Shimmer technique.

You need Lumiere (SU used to sell this, but hasn't carried it for about a year or two) and acetate. The directions on this technique can be found HERE.

The spiderwebbed acetate is actually a shimmery purple/green color. I used glorious green and lovely lilac reinkers to tint the lumiere. This card is actually my THIRD attempt at this technique tonight. When I located my Lumiere (it's been a while since I've used that stuff), it was all dried up! I was able to pour small amounts of water into the jar and stir it carefully with my paper piercer. Finally it started to loosen up and I was able to use it! It's still not the same consistency that it was when it was new, but at least I was able to participate in today's challenge.

I colored the haunted house image with Copic markers and cut it out with circle Nestabilities. Here's the rest...

RECIPE:
Stamps: House of Haunts
Ink: Momento Black
Paper: Lovely Lilac, Glorious Green, Basic Black, White
Accessories: Spiderweb Cuttlebug embossing folder, Copic makers, Lumiere, Glorious Green & Lovely Lilac reinkers, Black brads

Thanks for looking!!! Have a wonderful day! :)

Sunday, September 7, 2008

Dracula Box

Hi again! 2 posts in one day! Wowee! I've been playing around with one of my Sizzix Bigz XL dies... the shaker box. I pulled out my halloween stamps and this is what I came up with... }


Isn't it fun?!?! The box is about 3x3 and is a shaker box! It opens up and is filled with Reese's pieces.


RECIPE:
Stamps: Best Fiends, Sentiment from House of Haunts
Ink: Pallette Black Noir
Paper: Black, Real Red, White
Accessories: Sizzix Bigz XL shaker box, acetate, Martha Stewart dripping goo border punch, key tag punch, Prismacolor colored pencils, gamsol, Reese's pieces, velcro

That's all for today! If you're lucky, I'll be back to post again tomorrow!!! :)

Using XL Dies in the Cuttlebug

Hi all! I've received many inquiries on how I use the XL Sizzix plates in the cuttlebug. I am a SU demo, but didn't want to purchase the Big Shot that SU is now carrying. I already owned a cuttlebug and couldn't justify the purchase of another machine. So I purchased the Basket and Blooms XL die from SU and figured out a way to make it work in my cuttlebug.

First, the XL dies DO FIT through the cuttlebug. Many people on SCS have posted that they do not fit, but indeed they do! The sandwich that cuttlebug recommends for using thicker dies (like the Big Shot dies) is B plate, die, B plate. This sandwich works perfectly with the Big Shot Bigz dies, but the Bigz XL dies are longer than a single B plate. What I do is this...


As you can see, the Bigz XL die is laying to the right of the cuttlebug. The die is HUGE!!! Believe me... it DOES fit through the cuttlebug.


I place 2 B plates end to end. When they are end to end, they are actually slightly longer than the XL die.


I place 2 B plates underneath the Bigz XL die and 2 B plates on top of the die. I'm embarrassed to show you my one B plate.... lookie how marked up it is! That's the plate I always use when cutting with my Nestabilities! I think it may be time for a new set B plates to replace that awful looking one!


Finally, I run the whole, giant sandwich through my cuttlebug. It fits just fine and does the job! No Big Shot required to use the Bigz XL dies!

The only thing I've noticed with running the XL dies through my bug and using 4 B plates is that where the 2 B plates meet, you will get a slight indentation.. similar to a weak score line on your cardstock. But honestly, I don't think it's noticable at all! Once you get your creation decorated, you don't notice a thing!

I hope this helped answer your questions on how I use the Bigz and Bigz XL dies in my cuttlebug! Have a great day!!! :)