Tuesday, July 29, 2008

An early post!!!

Good morning! Boy, am I up early! This is quite unusual for me, as I am NOT a morning person. I was up late creating last night and decided to do the Featured Stamper challenge on SCS from Sunday. I was actually up at Put-in-Bay on our boat on Sunday and did not have a chance to play along then, or post!


This is a flap card. I should take a picture of it open. There is velcro under the cupcake image that holds the top flap down to the bottom flap. When you open it up, it says in the middle piece, "Hope your days is sprinkled with fun!" I thought it would be a great birthday card.

Recipe:
Stamps: Cupcake by Hero Arts
Paper: Pacific Point, Baja Breeze (both NEW SU in-colors), white, Cupcake paper from Basic Grey
Ink: Black
Accessories: Copic Markers, white taffeta ribbon, stickles, red rhinestone sticker, nestabilities, paper piercer, white gel pen, velcro

I can't believe how "right on" SU is with the new in-colors. I had been struggling with matching this adorable Basic Grey paper with any of my SU colors, but the new in-colors match perfectly! I'm totally in love with this paper, and may just have to head to Hobby Lobby to pick up another pack of it. Can you tell I have a coupon burning a hole in my pocket? :)

I'll be back later to post my card from today's color challenge.... groovy guava, sahara sand, whisper white. Have a great day!!!

Monday, July 28, 2008

Technique Challenge- Blinz Fold

Today's technique challenge was the Blintz fold. It's a basic origami fold that we incorporated onto our cards. It was super easy to do and really adds a lot to a card. To do the fold, you need to use double-sided designer paper to get the best results. I chose to use my Bella Rose paper... a new release from the upcoming SU catalog. I also pulled out my watercolor paper and reinkers to watercolor the main image. I like how it turned out, because I think it goes with the "watercolor-looking" designer paper.


Recipe:
Stamps: Infinite Goodness (retiring level 2 hostess), All Holidays
Paper: Kiwi Kiss, Pink Pirouette, Riding Hood Red, Watercolor paper
Ink: Stazon Black, Reinkers for watercoloring (riding hood red, kiwi kiss, close to cocoa)
Accessories: Styled Silver Hodgepodge Hardware

Thanks for looking! Have a great day!!! :)

More Swaps!

I've been busy working on swaps that are due soon. I think I'm finally done! Yahoo! Here's my final swap for the Non-Convention Goers demo-only swap at SCS.

Recipe:
Stamps: Sock Monkey
Paper: Red Riding Hood Red, Pink Pirouette, White, Bella Rose dp
Ink: Pink Pirouette, Black
Accessories: White 1/4 inch grosgrain ribbon, SU Markers (creamy caramel, close to cocoa, ruby red, black), dimentionals

I used the SCS sketch challenge from last week for the layout of this card. I think it turned out cute! At first I wasn't sure if I liked this set or not, but it has definitely grown on me.

I borrowed the set used on the card below from my mom after seeing a card made with it in the latest PaperCrafts magazine. This is a total case from the magazine, but I really like it!


Recipe:
Stamps: Illuminations (retired SU)
Ink: Blue Bayou
Paper: Blue Bayou, Blue Bayou Prints dp, white
Accessories: Blue Bayou double stitched grosgrain ribbon, ticket corner punch, nestabilities, dimentionals

That's all for today! Have a great night! :)

Thursday, July 24, 2008

Lookie what I did!

Stampin' Up! has just come out with a new line of home decor... called Decor Elements. They are essentially big rub ons for your wall. I saw the one that said "Create" and knew that I'd have to have it for my stamp studio wall. I spent about 45 minutes yesterday from start to finish putting it up and I LOVE IT! Take a look!

Isn't that cool??? I put it above the large cabinet that holds all my stamp sets. In the picture you can also see my collection of stamping magazines. I love what the definition brings to my stamp room and how it looks on the wall. It almost looks painted! My wall is painted a spring moss/celery color. It looks kind of olive in the photo but it's really not. The letters stand out on the wall a lot. Just thought I would share! Have a great night!

Thursday... Wedding Cards

Good afternoon! I was busy yesterday working on one of the crazy swaps that I signed up for. I pretty much spent ALL day working on it and finished them around midnight last night. I still have one more spot to go, so hopefully I'll get to that tomorrow. Anyways, here's my swap...


Recipe:

Stamps: Deer Friends (Level 2 hostess from NEW catty)

Paper: Chocolate Chip, Riding Hood Red (NEW in-color), Kiwi Kiss (NEW in-color), Very Vanilla

Ink: Riding Hood Red (NEW in-color), Kiwi Kiss (NEW in-color)

Accessories: Bella Rose DP (NEW), 1, 1 1/4, and 1 3/8 inch circle punches, scallop circle punch, 5/8 inch chocolate chip grosgrain ribbon


Today I worked on cards for two family weddings. The first wedding was a few weeks ago.... Ooops! Better late than never. The second wedding is this weekend. I'm not going, but I'll be sending a gift and card with my parents. I cased the cards from HERE on SCS. I used green on the one card because I think it matches their wedding colors, based off of their wedding invitation. I chose the purple because I thought it looked classy.

Recipe:
Stamps: Always (SU)
Ink: Spring Moss or Plum Pudding (PTI), Vanilla or White base
Paper: Spring Moss or Plum Pudding (PTI)
Accessories: Designer Paper from PTI, SU scallop border punch or Fiskars threading water punch, Martha Stewart butterfly punch, Satin Ribbon in Spring Moss or Plum Pudding (PTI), Stickles

That's all for today!

Tuesday, July 22, 2008

Today's Color challenge

What a long day yesterday! Jeff worked on the basement until around 1:30 am! Then he got up and went to work around 7:00 this morning! The poor guy is going to be exhausted tonight!


Today's SCS color challenge was to use River Rock, Soft Sky, and Very Vanilla on a card. I can honestly say that I'm going to miss these in-colors from SU when they retire. I never really got into last year's colors, but this year I found them very easy to work with. I even have brand new packs of the newest in-colors that I haven't opened yet because I can't stop using the retiring colors. Last week I put in one last order for the retiring in-color cardstock to help me make it through my fix. Anyways... here's today's card...

Isn't it pretty? I have a harder time working with the River Rock when putting it with a lighter color, but I like it!

Recipe:
Stamps: Take a Break by Annie LaPointe (My Favorite Things)
Ink: Black
Accessories: Markers (a mix of Copic and SU because I don't have all the copic colors that I wanted to use on this card), SU scallop border punch, NEW cuttlebug Argyle embossing folder, Nestabilities (scallop and classic rectangles), Soft Sky double stiched ribbon, copic spica clear glitter pen (on the flowers and few places on the tub)

I'm off to work on some swaps now. I'm going to try to use the newest in-colors. If I have time later, I'll try to post my creation. TTFN!

Monday, July 21, 2008

A new post! Finally!

It's been forever since I've posted... I got busy cleaning out my stamping studio and then I just didn't feel like stamping! Go figure! I must find my messing inspiring. Plus I had a bunch of swaps that I had to get done. Here are my latest cards!
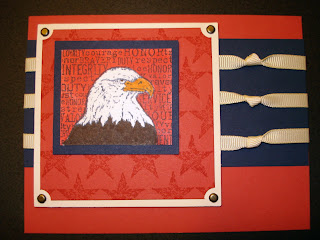
This card is for a SU demo only swap. I changed the layout a tiny bit on the swaps that I sent in... I didn't knot the ribbon on the final cards. It was too much work and using too much ribbon.

Recipe:
Stamps: The Free and the Brave
Paper: Ruby Red, Night of Navy, Very Vanilla
Ink: Ruby Red, Night of Navy
Accessories: brads, Vanilla grosgrain ribbon, SU markers

Isn't is pretty?!? I really like how it turned out. The knotted ribbon was actually part of a SCS challenge a few weeks ago and this was the card I created. I liked it so much that I decided to use it for the swap... minus the knotted ribbon.
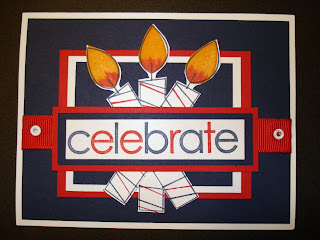
This card is also for a demo only swap. I browsed around on SCS until I found a few ideas that I really liked and then I used the inspiration to create this card. Patriotic, huh?!?

Recipe:
Stamps: Big Birthday Candle, Celebrate Everything
Paper: Whisper White, Night of Navy, Real Red
Ink: Night of Navy, Real Red, Pumpkin Pie
Accessories: White eyelets, 5/8 inch Real Red grosgrain ribbon
Technique: thumping (on candle flames)

Finally, this is my final swap card.
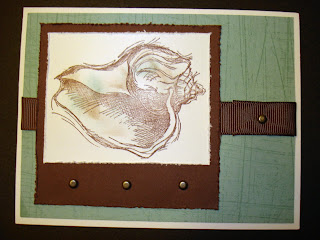
I made this also for a SU demo only swap. I needed to use a stamp from the "Naturals" section of the SU catalog.
Recipe:
Stamps: Seaside, Sanded background
Paper: Very Vanilla, Sage Shadow, Chocolate Chip
Ink: Sage Shadow, Chocolate Chip, Close to Cocoa
Accessories: 5/8 inch chocolate chip grosgrain ribbon, brads, distressing tool
Technique: sponging

These swaps are all mailed off and I can relax a tiny bit... I have a BIG swap due in a few weeks. I signed up for two positions in a 25 + 1 swap... that's 52 card fronts I have to make! Ouch! What was I thinking???

Today's technique challenge was a fun one today. Very challenging! We had to use the colors bravo burgandy and creamy caramel, a provided sketch, and the baby wipe technique all on the same card! This was hard for me, but this is what I came up with....
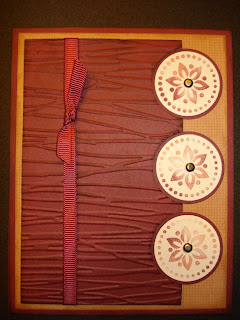
I think it turned out pretty!

Recipe:
Stamps: True Friend, Canvas
Paper: Bravo Burgandy, Creamy Caramel, Very Vanilla
Ink: Bravo Burgandy, Creamy Caramel
Accessories: Forest Branches cuttlebug embossing folder (yea! They arrived today!), 1/4 inch burgandy grosgrain ribbon, brads, circle punches, dimentionals


You can't really tell in the picture, but the dry embossed bravo burgandy piece is raised up a little on dimentionals. I punched half circles out of that panel so it sits above the actual stamped circles. I also adapted the baby wipe technique a tiny bit. I created a "stamp pad" out of the baby wipe and used the blended reinkers on the baby wipe to ink up my image stamp. I think it turned out pretty!


Today was like Christmas! I received a delivery from the UPS man! My SU preorder stuff finally arrived. I haven't had a chance to play with the new in-colors yet. Hopefully tomorrow. Plus, I mount all of my SU stamps on thin EZ-mount, so I'll have to do that too. In addition to my fun preorder... my cuttlebug order from Ohmycrafts.com finally arrived! This was the July release and I ordered 9 new embossing folders. I have so many new toys to play with! Plus, I ordered 11 of the holiday (Christmas, fall, and Halloween) folders that will be released in August! I can't wait to get those too!


Have a great night! I'm posting late tonight. Hopefully I'll be back tomorrow to post some more. See you then! :)

Wednesday, July 9, 2008

Today's Sketch Challenge... grapes!

For today's sketch challenge, I chose to use one of my favorite sets. Gorgeous Grapevine is one of those retired SU sets that will never leave my possession! I can always make beautiful cards and coasters with this set!

Here's my card....

I two-step stamped the main images and mounted them on squares cut with my classic square nestabilites. Once I had the pieces glued together, I decided that the card needed something else. So I pulled out my cuttlebug embossing folders and chose the script folder to emboss the card. I felt like the card STILL needed something, so I put copper brads in all four corners and attached copper cord around the edges of the card by twirling the cord around the brads. It was finished off with a bow in the copper cord. I think it turned out quite pretty!
Recipe:
Stamps: Gorgeous Grapevine (SU retired)
Ink: Vintage Violet (retired), Elegant Eggplant, True Thyme (retired), Always Artichoke, Sage Shadow (sponged around the main image panels)
Paper: Vintage Violet (retired), Creamy Caramel, Sage Shadow, Very Vanilla
Accessories: Classic Square Nestabilities, Cuttlebug Script embossing folder, copper brads, copper cord
Technique: Sponging (on embossed script and around edges of image panels)
Thanks for looking! Have a wonderful day!

Tuesday, July 8, 2008

Terrific Tuesday Color Combo Challenge

Today's color combination challenge was to use groovy guava, barely banana, and chocolate chip in a card. I never would have come up with this combination on my own. In fact, I never really cared for groovy guava, but I do like it with the banana and chocolate chip. Go figure!

When I put the colors side by side, I thought about the new ice cream set I just got yesterday from My Favorite Things. The colors just screamed ice cream to me! Here's my card...


Recipe:
Stamps: Here's the Scoop from My Favorite Things
Paper: Groovy Guava, Barely Banana, Chocolate Chip, White
Ink: Black, Chocolate Chip
Accessories: Cuttlebug Swiss Dots & Devine Swirls embossing folders, nestabilities (classic and scalloped oval), copic markers, sticker gemstone, spica clear glitter pen, dimentionals
Technique: sponging

Isn't it cute?! I love how it turned out!

Yesterday I totally forgot about the thank you card I made for my in-laws. For our anniversary, they bought us a set of mexican themed salsa dishes and bowls... really cute! I purchased the "Muchas Gracias" stamps from allthatscraps.com a few weeks ago and thought it would make the perfect thank you card for the salsa set. Here's my card...


I stamped the chihuahua three times and the cactus twice. I colored the images with my copic markers (love them!) and then cut out, layered, and popped up the cactus, dog ears, and hat to give him a more 3D look. The designer paper is actually from a halloween pack I bought at Archivers this past fall. The orange in the swirls matched almost exactly with the pumpkin pie cardstock. I think that chihuahua is soooo cute!
Tonight, my husband and I will go out to dinner for our 2nd anniversary. We're going to a restaurant called, Mitchell's Fish Market. It is awesome! I always get the Chilean Sea Bass, shang-hai style... they cook it with spinach and ginger and soy sauce. It is phenomenal! My mouth is watering just thinking about it. I can't wait!
See you tomorrow!!! :)


Monday, July 7, 2008

Whew! What a weekend!!!

Well... we're back! We spent Friday and Saturday up at Put-in-Bay with our boating friends. We got to watch beautiful fireworks over the bay on Friday night. It was great! On Sunday, we headed down to my husband's family for his great aunt's 95 birthday party. It was a very busy weekend!


I didn't get any stamping done over the weekend, but I did get to the challenge today on SCS. The challenge was to create a spinner card. I've never made one of these before, so it was kind of a challenge for me. Tomorrow is my husband and I's 2nd wedding anniversary, so I chose to make this card for him.


This first card shows one side of the spinner.. it says Happy Anniversary.


When you spin the spinner around it says, "My Sexy Handyman".


I used the "Handyman Jack" set from C.C. Designs. "Jack" doesn't have a goatee, so I added it to make him look more like my husband. My husband is always doing projects around our house. He is definitely my handyman. He has finished our basement, remodeled the upstairs of our house (all 4 bedrooms and master bath), put in an underground sprinker system in our yard, and fixed a leak in our roof. His next projects will be to redo our living room, family room, kitchen, downstairs bathroom, and the 2nd bathroom upstairs. All that and he's also working on making me ribbon gutters to store my ribbon. I'm really lucky to have such a handyman.


Recipe:
Stamps: Handyman Jack (C.C.Designs), Mixed Messages (Papertrey Ink), Weathered (SU)
Paper: Creamy Caramel, Chocolate Chip, Old Olive, White
Ink: Black and Chocolate Chip
Accessories: Screw brads, colored pencils & gamsol, punches (1 3/8 inch circle, 1 1/4 inch circle, designer tag, 1 inch circle), dental floss
Technique: sponging, spinner, gamsol magic

Here's a few pictures from my weekend....

This is a picture of Perry's Monument up on Put-in-Bay. It's the second tallest monument in the US... second to the one in Washington D.C.


This is one of my favorite restaurants... The Boardwalk. They serve the BEST lobster bisque. Plus you get to sit outside by the water and watch the boats go by. This picture was taken from our boat... we were one of the boats going by.

These are all the sailboats docked out in the bay. It was very busy for the 4th of July weekend!


My hubby driving our boat. Isn't he cute?


I'll be back tomorrow with more stamping, hopefully! I really have some swaps I have to do and get out in the mail by the end of the week. Yikes! Have a great night!


Thursday, July 3, 2008

No Fireworks... only rain!

Boo hoo! The fireworks were canceled for tonight because of the weather. But that did leave me time to finish up my 4th of July project and I didn't have to brave the spiders. Nothing like waiting until last minute to get my holiday themed project finished! My Christmas cards are always the same way!


Jan Tinklenberg had a project like this on her blog a few weeks ago and I loved it! So I ran out to the Target $1 spot and purchased 3 buckets and decorated them for gifts. I think they turned out really cute and were so simple to create!


Recipe:

Stamps: Seeing Stars from Verve
Ink: Brilliant Blue & Real Red
Paper: White & Brilliant Blue
Accessories: Red Rick Rack ribbon, small and large SU star punches, bucket, flags, M&Ms


Thanks for stopping by and checking out my project! Have a Happy Fourth of July!!!

A Get Well Card and Fireworks

Today's "Ways to Use It" challenge on SCS was to use scoring in some way on a card.... either doing an unusual fold or scoring on the card itself. I chose to make a masculine card (always a challenge for me) and to score a frame around the edges. I'm also trying to use up my In-Colors cardstock from last year, so I pulled out some of those colors to use. (Gotta make room for the new colors!) My father-in-law is having back surgery next week, so I decided to make this a get well card.


I used my score pal to score around the edges of the main sheet of cardstock. I scored 1/4 inches from the edge. I then stamped the deer image in stazon ink on a very vanilla panel and colored it with my watercolor wonder crayons. The deer image was cut out with the classic square nestabilities. Then I used the classic rectangle nestabilities to cut out the true thyme and kraft panels. I used my cropodile to insert the jumbo pewter eyelets in the true thyme panel and strung linen thread through the eyelets a few times. The linen thread was secured on the back with a mini glue dot. The sentiment, "Wishing you well" is from Verve stamps.

Overall I think it turned out really well! It's a very simple and clean layout, but most of my masculine cards are!


Here's the recipe:
Stamps: Noble Deer (SU), sentiment from Verve
Paper: Cranberry Crisp, Kraft, True Thyme, Very Vanilla
Ink: Black Stazon
Accessories: Watercolor wonder crayons, jumbo pewter eyelets, linen thread, square and rectangle nestabilities, Score-Pal


Tonight, my husband and I will be heading to his parent's house. They live on a small, private lake that does fireworks every year. We'll go out on the lake on the pontoon boat and watch the fireworks from the middle of the lake. The worst part is driving the boat through the tunnel to the main lake. The lake is split by a road, however there is a tunnel that connects the smaller lake with the main lake. Giant spiders live in this tunnel, so driving the boat through always gives me the willies! I usually sit on the floor of the boat with my hood or a blanket over my head until we get through to the other side. Hopefully, the rain will stop here and the fireworks won't be canceled.

I'm not sure if I will be able to post tomorrow or not. We'll be heading up to our boat on Lake Erie and spending a couple of days with friends over at Put In Bay. We'll watch the fireworks up there too and hopefully enjoy Heineman's winery (my favorite part of going over to the island). Have a happy 4th!!!!

Wednesday, July 2, 2008

Today's sketch challenge


For today's sketch challenge, I chose to use one of my Bugawumps stamps. So cute and summery! I pulled out my Basic Grey figgy pudding paper... can you believe this paper was actually with the holiday collection?!? To me it just screams "summer"! I colored the image with my copic markers. Lately I've really been working at improving my shading skills with the markers. I only have sets A & B from the Ciao collection, so that kind of limits the shading I can do. I don't think this turned out so badly!
I used my cuttlebug to emboss the side piece with the dots and circles. Finally, I used some SU buttons that tied in the with colors in the designer paper and tied some silver elastic cord through the buttons to embellish.
Here's the complete recipe:
Stamps: Bugawumps
Paper: Certainly Celery, Pretty in Pink, Soft Sky, white, Basic Grey designer paper
Ink: Pallete black
Accessories: Copic markers, SU buttons, silver cord, cuttlebug embossing folder
Thanks for looking! :)

Today's the day!

Today's the day I decided to start my brand new blog. It seems that to get noticed for any design teams in the stamping world, a blog is the way to go. So.... here it is! I plan on posting my stamping creations here as well as using my blog to diary a little about my life. I'll be back later to post some of my stamping creations! See you later!